Archive for the ‘Motorcycle Gear’ Category

A Buddy Named Jeff

Monday, November 16th, 2015
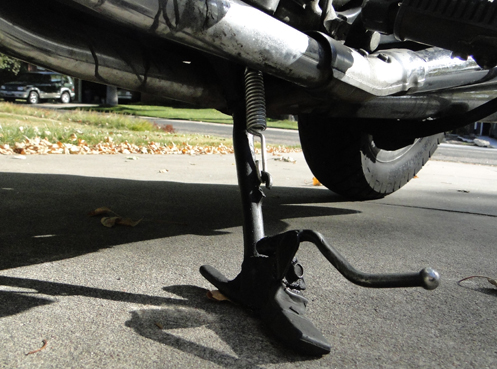
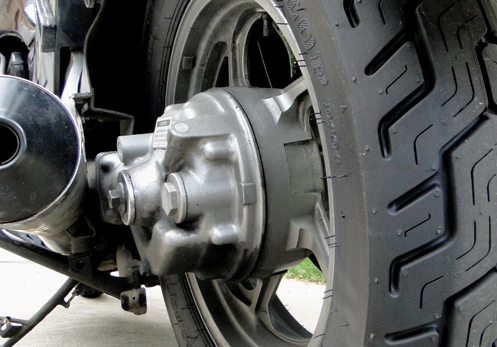
The spring on a side-stand.

It took Jeff about a minute to whip this baby out.

Is there some kind of law that if you rent V-Stroms you have to have a buddy named Jeff who is big into motorcycle mechanics and can fix just about anything on the spot? My experience would suggest that.

I know two guys who either do or have rented V-Stroms and both have that very particular Jeff. Kevin rented bikes, mostly V-Stroms, out of Gunnison for a number of years through his company, Colorado Mountain Moto. Ron still rents V-Stroms but also other bikes now through his company, Western Dual Sport Motorcycle Adventures.

I went on a 10-day ride this summer with Kevin and–you knew this was coming–his buddy Jeff. Jeff works as a motorcycle mechanic, which is a good thing because he rides a couple Moto Guzzis. From what I understand, Guzzis are “quirky” and if you’re going to ride them you’d better be able to work on them any time you need to.

Jeff needed to. And he did. And he had everything he needed to do whatever was needed. We ended up at his place outside of Boise later in the week and then we really got to see how into this he is. Besides a garage full of bikes and parts, he built his own very large shop that is full of more bikes that he is in the process of restoring. And any tool you might need was right there at hand.

Then more recently I was up in Boulder with Ron with the intent of replacing my worn out valve stem on my Honda. And where did we go to do this? To Ron’s friend Jeff’s house. Ron actually owns this tire changing machine but he keeps it at Jeff’s because Jeff gets a lot of use for it and Ron really doesn’t have a place for it at home.

Jeff is not a professional mechanic but he does race bikes and gets very much into working on them. While Ron and I were figuring we’d need to take the wheel off the bike and use the machine to break the bead so as to get to the valve stem, Jeff pulled out this handy little portable bead breaker and they were able to replace the valve stem in less than 10 minutes without taking the wheel off the bike.

But then the really amazing thing happened.

Ron and I were getting ready to leave and I got on the bike, kicked the side-stand up, and fired her up. Just then Jeff called out urgently to warn me that my side-stand was down. Funny, I thought for sure I had just put that up. So I nudged it up with my foot and it just swung freely. It wouldn’t stay up. There was definitely a problem of some kind.

I killed the bike, kicked the stand back out to hold the bike up, and got off. It didn’t take long to find the problem: the spring that holds the stand up out of the way was broken. One of the hooked ends had snapped off and it was just dangling from the other. This bike is a 1981 model so after 34 years the spring just gave out. And it gave out right here, at Jeff’s, of all places.

What happened? Jeff went rummaging through a drawer and in just a few seconds pulled out an identical spring that fit perfectly. He just happened to have it on hand and knew right where it was. It took longer for Ron and me to get the thing on than it took Jeff to find it. And there I was, all patched up, just that quickly.

I tell you what, I don’t care if you rent V-Stroms or not, everybody should have a buddy named Jeff.

Biker Quote for Today

Honda 919s are as reliable as an anvil, albeit faster. — Ray Nierlich

New Valve Stem Without Removing The Wheel Or Tire

Thursday, October 22nd, 2015
motorcycle valve stem replacement

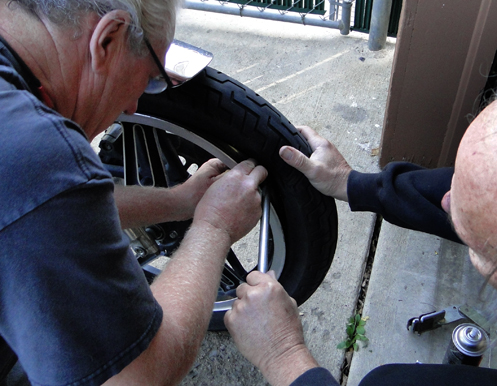
Thanks to Jeff's portable bead breaker this job took five minutes.

I’ve been really nervous every time I’ve ridden the Honda since I first noticed the valve stem on the front tire was rotting away. That was in June and I finally got it replaced this past weekend.

I met Ron in Boulder and we went to his friend Jeff’s house where Ron keeps his tire changing machine. The expectation was to remove the wheel and then take the tire off before replacing the valve stem. A good half hour job or more.

Fortunately, Jeff was home at the time and he had a little device that turned this into a five minute job.

With the bike on the centerstand, Jeff pulled out a portable bead breaker, which is like a set of tongs with plates at the squeezing end and enough length in the handles to get leverage. After releasing the air, he positioned the plates on the sides of the tire by the valve and squeezed. That broke the bead free from the wheel and with a couple tire irons to keep the tire shoved aside, Ron removed the old valve stem and then reached in to insert the new one. Hook up the air pump and give it a blast and presto! Job completely finished, just that quick.

valve stem on motorcycle wheel

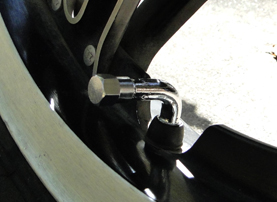
This new valve stem will make it easier to put air in.

Not only that, but this new valve stem is a big improvement over the last one. The last one was the typical rubber kind, whereas this new one is a metal stem with a 90 degree bend that makes it easy to get the air hose onto it. You can see it there in that photo.

It’s not so important on this front tire because there’s plenty of space to get to even the old type. But on the rear wheel it’s a totally different story. The space is so cramped that getting a hose on incredibly hard. Some years ago I bought a metal, L-shaped extender specifically to make it possible to get at that valve easier. The extender is very much like the new valve stem. So anyway, we didn’t put a new stem on the rear at this time because it’s going to need a new tire soon anyway, but now I have a second one for the back when the time comes.

What a huge improvement!

Biker Quote for Today

Murphy’s Motorcycle Laws: 8. “Universal” accessories are so named because that is where you must search to find the bike they fit.

Prepping For The OFMC Trip

Thursday, July 16th, 2015
New tire on Kawasaki

Got a new tire--I'm ready to ride.

We leave tomorrow on this year’s OFMC trip and I’ve got a lot to get done. Right now I’m at Joel’s (Mountain Thunder Motorsports) taking care of the single most important thing on my list: getting a new rear tire on my Concours. The used Avon tire Jungle put on it three years ago when I got a puncture in my six-day-old Dunlop is just about shot. Time for another new Dunlop.

Then there’s so much more to be done.

Of course I have to pack, though that will be less of a job than it was for the recent trip with Kevin and Jeff. We camped on that trip but the OFMC does not camp any more. That lightens my load considerably.

All my electronic devices need charging. How many of these do you travel with? Here’s what I carry.

  • laptop
  • cell phone
  • PDA (a Palm–yes, antique, but I don’t have a smart phone)
  • digital recorder (good for quickly and easily capturing thoughts and details I might otherwise forget)
  • cameras (two)

I also want to get a haircut today. My hair is long enough that on this last trip a strand or two would often get loose in my face in my helmet, flicking with the breeze and tickling my face. And hard to effectively tuck aside.

And these things unrelated to this trip that just need to get done:

  • send an invoice to a client for services rendered
  • plant some more beans and lettuce in the garden
  • take my car to the car wash (I have a coupon for a free cleaning and it’s going to expire)
  • water the houseplants

Yep, busy day. But right now, here at Joel’s, I guess I’ll just read this March issue of Rider magazine.

As an aside, here is a useful resource from a biker lawyer on safe driving for motorcyclists.

Biker Quote for Today

You have 1/4-inch chicken strips? Wow, I’m so impressed!

Getting Ready For Motorcycle Camping

Friday, January 9th, 2015
Gear for two-up motorcycle camping

Compact is the word when it comes to two-up motorcycle camping.

Judy and I tried out two-up motorcycle camping once last year. It was OK for a first time and we learned a few things. Now we’re acting on what we’ve learned and planning to really do this thing this year.

Compact is key when it comes to two-up camping on a bike. I’ve been camping by myself on my motorcycles plenty of times and it’s easy. The bike has plenty of room to pack one sleeping bag, a tent, a foam pad, food, and whatever else you need. It’s totally different when you’re two-up.

When you go two-up you now need two sleeping bags, two foam pads, clothes etc. for two, food for two, and a significant part of your packing space–the seat behind you–is taken up with non-gear, i.e., your wife/spouse/friend, whatever. That’s why a lot of people who are serious about this pull a trailer, but that’s not something I have any interest in.

So compact is the word.

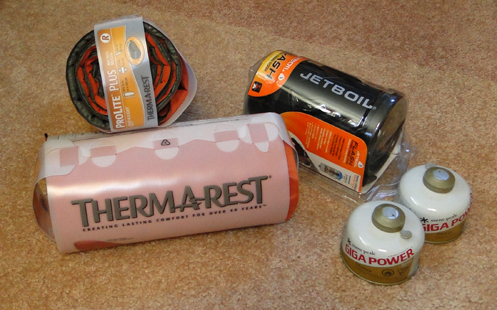
We had already bought two down sleeping bags because they squeeze down smaller than our fiber-fill bags. Now we bought two Thermarest self-inflating mattresses. The two of them take up less space than one of the pads I used to use. That’s a step in the right direction.

On our test run last year we learned one thing profoundly: Having no provision for breakfast or even coffee in the morning sucks. Figuring we were going close by and just overnight we had figured we could do without that kind of thing. “Cold camping” I believe it’s called. So we woke up at about 9,000 feet elevation and it was cold and we had no way to even have a hot cup of joe. Rather than enjoy our camping experience we quickly broke camp and rode over Guanella Pass to Georgetown and had breakfast there. We’re not going to do that again.

Asking around I found that the consensus is that the compact JetBoil cookstove is the way to go. It’s designed for backpackers, so it’s small and light-weight. We don’t care about weight on the bike but we do care about small. The JetBoil and its gas canister are probably smaller than a two-liter bottle of pop. So we got one of those and also some dehydrated camping meals. Now we’ll heat water in the evening and pour it in on the dehydrated food and that will be dinner, and at the least we’ll heat water in the morning for coffee. Of course this all eats up most of the space savings we made with the smaller pads.

Which brings us to the choice of bikes. We took the V-Strom last year because it’s the dual-sport bike and seemed the natural. Plus, it has two very large Givi side bags that hold a lot, and I have a top bag on the rear as well. It might still be the bike of choice, especially if we’re going somewhere where we’ll have to be on a lot of gravel.

We do want to try the Concours, too, however. There’s no top bag, but unlike the V-Strom it is easy to strap a bunch of stuff on the rear, behind Judy. Plus, when you’re strapping stuff on the back, larger or awkward sizes are not much issue, whereas they are if you’re trying to get something inside something else. The two side bags are quite large, too, so I’m thinking it should certainly hold as much as the V-Strom. We’ll try the Concours on a trip where we know we won’t need to do gravel. The Concours hates gravel. Hates it!

I’m not sure if we’ll be getting more stuff or not. A tent that packs down smaller would be good on the V-Strom, but on the Concours it’s no issue. Less bulky clothing specifically designed for this sort of thing could save space. We’ll see.

Right now, though, we’re just waiting for warmer weather. I had hoped to get out for my first ride of the year today but freezing rain overnight and cold temps early in the day persuaded me otherwise. Camping weather–June–is still a ways off. Patience.

Biker Quote for Today

Companion wanted. Male motocrosser seeks caring and generous lady with her own dirt bike. Please send photo of dirt bike.

Riding As If Any Day Could Be The Last

Monday, December 15th, 2014
Helmet chin flap

I love how warm this flap keeps my chin and upper neck.

The snow arrived Sunday morning instead of Saturday night, as had been predicted. Doesn’t matter, it came.

Meanwhile, Friday and Saturday were good days to ride, and knowing at this time of year that any day could be the last rideable day of the year, you bet I did. Friday I rode to work, which has an even greater possibility of being the last day this year I can do that. It probably won’t be, but it has the possibility. And Saturday I took a ride up to Loveland for a meeting. Both were glorious.

Once again the cold-weather gear was crucial. The electric vest was key, and more and more, the heated gloves are also becoming key. Saturday I also wore my fleece-lined chaps because it was going to be a longer ride, at higher speeds, in cooler weather than Friday.

One item I haven’t mentioned before is this flap on the under side of my helmet, as you see in the photo above. I’m growing to love that thing. Wearing a different helmet on Friday, the wind came up under the helmet and my throat and chin were cold. On Saturday I wore the helmet with the flap and my chin was toasty. It’s an amazing difference. Of course, a turtleneck helped, too.

I’m getting more acquainted with the electric gloves as well. These are Gerbings and they are battery powered. Both the previous weekend and then again on Saturday I ran those batteries dead. That’s starting to give me a feel for just how long they are really good for. Which is to say, two hours at the number two setting is about all they’ll do. But I’ve also learned something else: they are, all by themselves, very warm gloves. Even once they go dead they do a darn good job of keeping your hands warm.

That makes sense. The designer wants to make the batteries last as long as possible. The warmer the gloves are just on their own, the lower the heat level can be set, and the longer the battery life. Now I’ll start experimenting with using them as the level three setting. If my hands are still acceptably warm, that should nearly double the battery life. It’s not really so important that your hands be toasty warm, but rather that they not become numb little ice cubes. Yes, I know some people will say you should just get gloves that plug into the bike, just like the vest, but I don’t like all those wires. And with batteries I can wear the gloves anywhere, not just on the bike.

It’s also nice that the gloves are getting more broken in now, less stiff, and are conforming to my hands.

So the forecast for the next week is cold with more snow flurries at least. Who knows when it will be decent riding weather again. It’s now time to start hoping for good weather at least on Dec. 31. That’s the date of the Last Brass Monkey Run, which is traditionally the final organized ride of the year. Of course, then there’s some group–can’t remember who, the BMW guys?–who do a January 1 ride each year. This is a big reason I love living in Colorado.

Biker Quote for Today

My motorcycle is a gift from my children, purchased with money they will not inherit.

New Tire, Chain, Sprockets, Air Filter for the V-Strom

Monday, September 22nd, 2014
Putting a new chain on a V-Strom

Ron Coleman putting the new chain and sprockets on my V-Strom.

I consider myself very fortunate to know and deal with motorcycling people who are a lot more adept at some things than I am. Such is the case with Ron Coleman, who runs Western Dual Sport Motorcycle Adventures.

It’s not that I don’t have a mechanical bent, but I do not have the tools to even try doing some of the work it takes to keep a motorcycle running. Ron recently helped me get a new rear tire on the V-Strom as well as a new chain and sprockets. He also replaced the air filter. Out of all these tasks, the only one I could conceivably do myself is the air filter. Having seen it done twice now I’m actually thinking I could do it.

For the tire, forget it. I don’t have a tire changing machine and I know from experience how tough it is to change a tire without one. Ron does and he made short work of getting this new Shinko on. Now I have matching Shinkos front and rear and can’t wait to get out in the dirt and see how it feels. I was on the dirt a little when we went to the Black Hills in July and the bike was very unstable. When you figure that I had a nearly bald street tire on the rear it’s no surprise. Now I’ve got real rubber back there.

The one thing I did see from the tire change was how to take the wheel off the bike and put it back on. I might be able to do that, which could be a good thing if it ever came to needing to take the wheel and tire somewhere to have someone else do the tire replacement.

And there is no way I’d ever be able to replace the chain and sprockets myself. For one thing, getting the old chain off entailed using a grinder to cut away the heads of two pins in the chain, so as to open up the loop. Replacing the sprockets was pretty straightforward but even then the fact that Ron had the right tools made the job so much easier than it might have been. Putting the new chain on also required cutting away an extra link and then using a specific tool to pop in the connecting links and peen (as in ballpeen hammer, I presume) them to spread the ends so they don’t slip out.

I watch this all going on and I see exactly why I generally pay someone else to do it. I don’t mind getting dirty, and I’ve always enjoyed taking things apart and fixing them and putting them back together, but this is just out of my league.

To get to the air filter it is necessary on this bike to remove the gas tank. That stopped me once in the past when I was going to replace the spark plugs on my Concours. I had no idea how to remove the tank. I still don’t.

On the V-Strom it just takes removing a few screws and then raising the tank up on a hinge while disconnecting the fuel line. Best to do this when you do not have a full tank–all that gas is heavy. So you lift the tank off and then take four or five screws out to remove the housing and presto–there’s the air filter. Lift it off, put a new one in, replace the housing and drop the tank back on. Put the screws back in and voila!

It really is good to know people like Ron. I’m very indebted to him for everything he has helped me with on this V-Strom. Ron knows V-Stroms really well because he has several that he rents along with a bunch of other bikes, including his latest, a Yamaha Super Tenere. After the work was all done we went for a ride and I rode the Tenere. I’ll tell you about that shortly.

Biker Quote for Today

There is no physical training regimen so strict that it can’t be undermined by a rigorous program of deferred motorcycle maintenance.

Tips for Two-Up Motorcycle Camping

Monday, August 11th, 2014
Tent with space for motorcycle

Thyrza sent this photo of the tent they use, which has room for their motorcycle.

I was discussing two-up motorcycle camping recently and got a response from Thyrza, who has done this a lot. She agreed to allow me to reprint what she sent me. Here it is:

So I found your website while searching for motorcycle rides in Colorado and noticed from some of the stories that people thinking camping 2-up without a trailer is difficult or impossible even. My husband and I live in Ohio and have traveled to Michigan, Maine, North Carolina, South Dakota and this year will be going to Colorado. We tent camp the entire time and ride 2-up. I thought I would share how we have made it work.

We ride a Honda VTX-1800 – it’s a large cruiser style bike so can easily handle the weight of anything we strap to it. We currently have soft bags so there isn’t a lot of room in them. However, we just bought new hard bags and are waiting for the paint job to be done. They will hold at least half as much more stuff as our current bags, so I’m quite excited to see what more I can take with us! We added small luggage racks to the tops of the bags so we could still strap on the sleeping bags.

First and foremost, compression/dry bags are your friend. We put his sleeping bag in a compression bag alone, and mine w/both of our small camp pillows, a sheet, and two hoodies in another (his bag is quite a bit bigger than mine). Each bag compresses down to just a little bigger than a lumpy basketball. We use bungee nets to strap one to the top of each saddle bag. The compression bags are also dry bags so they keep everything 100% dry – and we have been caught in more than one torrential downpour. We use our saddle bags for personal items – each of us gets one and whatever fits is what you get. Lucky for him I’m a light packer and reasonably low maintenance. We have a large bag on the back that we put all our “stuff” in. We love our JetBoil – it heats water in about 1 minute so you never have to go w/o coffee on a cold morning. We also bought the cooking pot and frying pan and they work great! Instead of a sleeping pad, we first used Big Agnes air mattresses, but got tired of having to manually blow them up. We just replaced them this year with new ones that inflate with a built-in foot pump. These each role up to about 6-7” around and about 11” long. They are bit bulkier than the Big Agnes but more comfortable. We also have a tank bag that we use for his camera, all our charging cords, and miscellaneous items that we want quick access too.

As far as rain gear, my husband is quite a safety freak, so he insists when traveling that we are in full gear. So we made sure that our coats and pants double as raingear, so one less thing to have to pack. I used to whine quite a bit about how ugly it looked (because it is after all, all about fashion), but after going w/o my jacket in 100+ degree heat riding into the Badlands 2 years ago and getting sun stroke/sick, I learned the value in keeping my jacket on. Gym shorts under the pants make them actually quite comfortable and less hot than bluejeans. Hard to believe, but true! And ladies, all the pockets in the jacket eliminates my need to haul a purse. Plus, when you ride into an unexpected rainstorm and there are no overpasses to hide under, it’s nice to stay dry w/o taking the time to get re-dressed.

Our biggest purchase was the tent… as you can see from the picture, the tent has a built-in garage for the bike! In the actual sleeping area, you can fit two people comfortably (husband is 6” and has no trouble end to end fitting), but there isn’t a lot of extra space. We store our gear in the vestibule area of the tent. We strap the tent onto the top of the tail bag with rock straps. And then to top it off, we have a small soft-side cooler bag (rectangular in shape and just tall enough for a short can of soda), that we strap on top of the tent. It’s a tight fit, but we make it work. Last year we found small folding chairs – they have 2 back legs and then you use your legs for the front and sort of rock back… comfortable, but hard to get into initially. Not something to sit in if you are drinking a lot! We connect these with straps to the D-rings on our tail bag and they tuck down between the bag and sleeping bag on each side. We got tired of having to sit on a picnic bench or the ground, so they were a good investment. (You can see the chair bag – it’s the red little bit sticking out on the left – the other one is on the other side.)

There isn’t a lot of extra space, and we really have to think twice about everything we take, but we manage and it’s a lot of fun! When we go on long trips, we take 3-4 day’s worth of clothing and just plan on doing laundry every so often. If someone wants brand names on any of the gear, I can dig the stuff out and get it.

The pink jacket is where I sit, and the yellow jacket is his seat. I joke that we won’t get hit by someone cause they can’t see us, but more because they’ll be laughing so hard! (I have gotten rid of the pink jacket and bought a nice conservative black one – got tired of looking like the Pink Power Ranger!)

Anyway – tent camping on a motorcycle without a trailer, riding 2-up is 100% doable! We have a great time! Our goal is to hit every state in the continental 48 – after Colorado this September, we’ll be at 25!! In just 5 years of traveling. Not too shabby!
___________________________
So there you have it. It can be done, if you’re ready to be selective and resourceful. Thank you Thyrza. Here, below, is the other photo she sent showing the VTX loaded for camping.

VTX Loaded For Camping

The VTX loaded for two-up camping.

Biker Quote for Today

More Gear for the V-Strom

Thursday, July 31st, 2014
V-Strom Crash Bars and Skid Plate

The new SW Motech crash bars and skid plate make my V-Strom much more prepared for riding off the pavement.

I’m not much of one to add stuff to a motorcycle. The V-Strom is proving to be the exception.

Besides the throttle lock and top bag I already added to that bike, I’m now pleased to say that I have added crash bars and a skid plate. Next up is highway pegs, although that has proven trickier than I expected.

I wasn’t planning to take the V-Strom on the OFMC trip last week but the Concours had a rear tire that was so on the cusp of whether it would make it or not that I decided not to chance it. But I didn’t want to go on another long ride, like last year, on a bike with no highway pegs. We’re talking about you, V-Strom.

The problem was, there is nowhere on a stock V-Strom to attach highway pegs. A related problem with the V-Strom is that the radiator and oil filter are just hanging out down there, fully exposed to anything flying up off the road. I don’t understand Suzuki’s thinking on that. That’s just too vulnerable, especially if you go off the pavement.

Fortunately the solution to one problem provides a solution to the other. Put on crash bars, which gives you a place to attach a skid plate, and that protects the radiator and oil filter. It also gives you something to attach highway pegs to.

Thanks very much to Ben Kriederman at House of Motorrad, I got the crash bars and skid plate on on Thursday evening before we left town on Friday. I’m truly grateful to Ben for putting these things on for me because there was no way I was going to be able to do it myself.

I did try. The problem was, although attaching the bars was pretty simple, just four bolts on each side of the bike, busting those bolts loose was beyond my meager tools. I had an allen wrench and an extender but I quickly saw that if I applied enough pressure to bust the bolts loose, all that would actually happen would be that I would bend the heck out of my allen wrench.

It’s wonderful having the right tools for the job. Ben did and he quickly took care of the bars, but then the skid plate even gave him some trouble. It seems the (supplied) replacement bolts fit fine but the (not supplied) washers were just too small for the new bolts. They had to be drilled out.

Ben got ‘er done and even threw in an oil change while the bike was up on the lift. Nice guy.

The next day, on my way out of town, I stopped at Vickery and bought some highway pegs. I figured I’d put them on in Brush or in Chadron when I had a moment. Uh-uh. The pegs came with two sizes of strap to go around the bars, but the small (7/8″) was too small and the large, with the provided spacers, came completely together without being tight enough to hold the peg in place. So I made the whole ride without highway pegs again. Fortunately, this trip was mostly short rides so I didn’t miss them terribly.

I figure now the thing to do is put some rubber strips under the strap to both prevent scraping metal on metal and to take up room, making it possible to tighten things and have it hold in place. I was hoping to do that yesterday but it didn’t get done. It will get done this weekend.

Then, let’s see . . . what else does this bike need?

Biker Quote for Today

Money can’t buy happiness. But… it can buy a motorcycle. And you can’t be sad on a motorcycle.