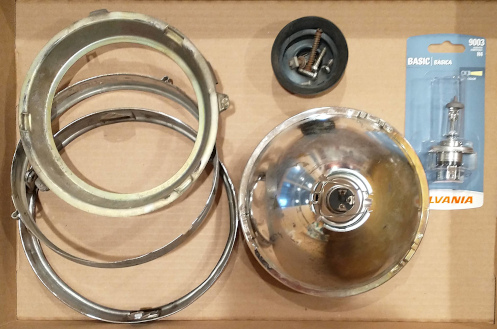
Everything disassembled. All I really needed to do was remove that rubber backing, undo the wire clip, and replace the bulb.
It was recently brought to my attention that the low beam on my Honda CB750 Custom was burned out. So I flipped it to high beam but on the last RMMRC ride the guy in front of me complained that my headlight was annoying to him in his mirror. OK, I’ll fix the headlight.
I have a Clymer shop manual for this bike but the explanation for replacing the light was not exactly crystal clear. In fact, once I successfully got the job done I had to wonder if maybe the light I replaced was of a newer design than that detailed in the book. But, figuring it couldn’t be too hard, I just had at it.
The first part was easy: remove two screws and pull the assembly out of the casing. Unplug the bulb. Now, with the unit separate from the bike I set it on the table and looked it over, with the manual open next to it. The instructions say to remove the ring that holds the bulb in the unit but I also had to remove another, inner ring. So now I had three separate rings and a bunch of screws and nuts and one spring. I was hoping I would remember how to put it all back together.
I also had to remove a rubber covering that the three prongs of the bulb came through. When I did that I noticed there was a wire clip that appeared to be holding a bulb in the center of the unit. I had been expecting to replace the entire assembly but now I wondered if all I needed to do was remove that clip and pull out the bulb, then put in a new bulb. In which case all this disassembly was totally unnecessary. I knew this was a standard automotive headlight so I took it over to an auto parts shop.
At the shop the guy at the counter looked it over, removed the clip, pulled out the old bulb and got me a replacement off the rack. So all that disassembly had been unnecessary. But when I got home and re-read the manual this did not fit what they described. Which is why I wonder if this was a newer design. Regardless, I had to put it all back together now.
Fortunately, the Japanese were well ahead of the U.S. in terms of ergonomic and intuitive design. So even back in 1980, when this bike was built, the design was logical. The ring the whole headlight itself went into would only accommodate the thing in one specific way, and there were two screws obviously needed to hold them together. Next, the second ring would only attach to the first in one specific way, again with a couple obvious screws.
Then there was one odd screw and spring that, had I not been the one to dismantle it, I would have had a really hard time figuring out. But now there was only one place these could go. Of course there was no question where the rubber piece needed to go.
Mounting the unit back into the casing was a bit uncertain because there were three points for screws but only two screw holes. I knew the two on the sides were mandatory and that I had pulled screws out of there. But there was one at the top with nowhere to attach it. But the screw that had been in that slot also did not have a nut. Maybe this, too, was just a factor of the headlight not being the original or the original design. I just ignored that top screw.
The casing for this whole unit has always been in rough shape ever since I bought the bike used, some 30+ years ago. It has never sealed tightly and I had wrapped it with electrical tape to keep out moisture. I retaped it and voila, done.
Now I just hope that if I ever, say in 20 years, need to replace the headlight again, that I remember and do not dismantle the whole thing again. This whole thing could have been a 20 minute job. Maybe a 10 minute job. Hopefully I live and learn.
Biker Quote for Today
Last night, the police stopped by to tell me that my dog was chasing people on a motorcycle. That couldn’t be my dog. He doesn’t ride motorcycles.
Tags: CB750 headlight