Archive for the ‘Motorcycle Gear’ Category

What I Dislike The Most About My CB750

Monday, May 10th, 2021

Just getting to the bolt that holds the seat on is difficult.

My 1980 Honda CB750 Custom was my first motorcycle and I still have it and I have always loved it. That said, nobody–and nothing–is perfect.

I can say for one thing that I’m not crazy about the chain drive. Having to lube that chain, adjust it occasionally, and replace both it and the sprockets at times is a bit of an annoyance and also a bit of expense. But I live with it. And from what I’ve read, chain drive has some advantages over shaft drive, though I’m not particularly attuned to those sorts of things. I just ride the bike.

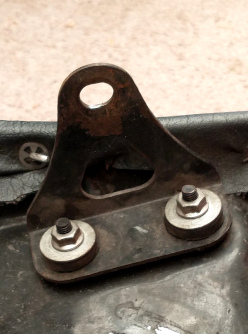
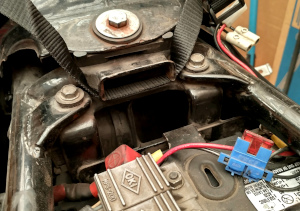
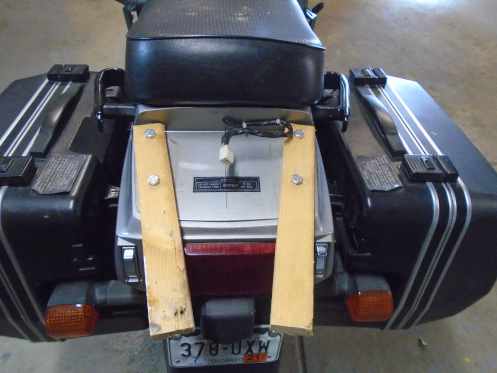
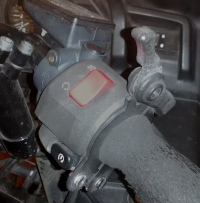
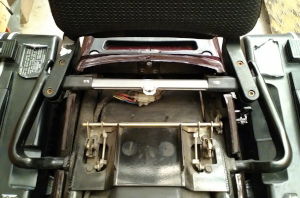
Upside down here, this is the flange under the seat.

There is one thing, though, that is just an out and out pain: unmounting and mounting the seat.

Motorcycle design has changed in a huge way since 1980 and getting the seat off and on is one in which the improvement is especially huge. On both my 1999 Kawasaki Concours and my 2006 Suzuki V-Strom all you have to do is insert the key and turn it, then pop the seat off. To put it back on you just position it properly and press down till it clicks. Couldn’t be simpler.

Not so on the CB.

On this bike there are two bolts that go through holes in two flanges that extend downward from the seat frame. You can see the flange in the photo at right. These bolts screw into the frame of the bike. Under the best conditions this is a simple process with a wrench. I do not enjoy the best conditions.

First off, the seat, after 41 years, seems not to be completely symmetrical and so I find it necessary to lay across the seat from the left, putting my weight on the seat to push it down just enough to free up the bolt. Then on the right I have to lift the seat just enough to free up the bolt.

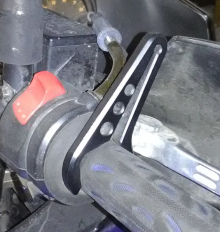
On top of that, when I first bought the bike it came with a sissy bar already on it, which is great, I like that. But the rail attaches the sissy bar to the frame of the bike in a way that blocks access to the seat bolts. I don’t have to take the sissy bar off, but it is definitely awkward reaching around it to get at the bolts.

What this amounts to is that an operation that takes about three seconds on my other two bikes takes at least five minutes on the Honda and I need to have the proper tools to do it. OK, so if this is the toughest thing I’ve got going in my life I know I’m not getting any sympathy from anyone. And I’m not asking for sympathy–just making note of one of life’s little irritations. I’ll live with it. Heck, I’ve lived with it for more than 30 years already.

Biker Quote for Today

You might be a Yuppie biker if your ponytail comes off with your cap.

Specs On Tank Bag; Set-Up Completed

Thursday, May 6th, 2021
Viking Bags tank bag

The new Viking Bags tank bag mounted on my CB750.

I took the Honda for a ride to see how the set-up I had used on this new Viking Bags tank bag was going to be secure. It was, but I figured I could configure it better. So I did.

tank bag on motorcycle

I now have the straps running around the steering column. Note that I can put gas in the tank without removing the bag.

As you can see from the picture above I no longer have the straps looping back over the sides of the tank. As the other picture shows, they now go into the cleft where the tank fits over the spine of the frame and around the steering column. Dipping below the tank it then loops around a couple frame members to hold it securely. In doing this I was very conscious of positioning the strap to not crimp any cables or wires or anything, and to not be located such that movement of the bars left and right would cause rubbing and wear.

In short, I think it’s well set up and should be fine for the long term, though I will check it periodically at least for a while so as to be sure.

So, so much for set-up. What about the bag itself? The first thing you have to understand about any Viking Bags product is that they are targeting the lower-priced end of the market. If you want premium quality and are willing to pay for it, buy Harley gear. If you want something that is perfectly satisfactory but maybe a little rough around the edges for a very affordable price, then Viking does a very good job.

That said, the bag has a fairly large storage space that can unzip to create a really large space. If you wanted to stand a water bottle upright at the back end, closest to you, there would be no problem at all. The detachable map case (Velcro) is a good size: 8-1/2 x 10. That’s big enough to fit a full two-panel section of most maps.

There is also a small zippered pocket on the bottom portion of the rear, rider-end of the bag that you could use small items you want quick access to. Some tank bags have a softer, grippy base layer that is actually in contact with the tank, that keeps the inevitable rubbing from wearing away at your paint. That’s one of those premium items that you pay more for; don’t look for that with this bag. I may try to come up with something to put under there to protect the paint–it seems like maybe a chamois cloth would work well–or I may just ignore it. Probably the latter. I mean, I’m assuming the material is nylon, and nylon won’t scratch the paint; it’s the grit that gets in between the bag and the tank that does the damage.

I really think I’m going to like having this bag. It’s a good size and can carry my rain suit so I won’t need to put the saddle bags on for that. I’ve been sold on tank bags for a long time. Now I finally have one on the Honda.

Biker Quote for Today

You know you’re a biker when you lie to your wife in order to spend more quality time with your bike.

Checking Out A New Tank Bag

Monday, May 3rd, 2021

My first–but possibly not my last–stab at setting up this Viking bag on my 1980 CB750.

I’ve had a tank bag for my Kawasaki Concours for years and it’s been great. More recently I got a tank bag for my Suzuki V-Strom and it’s a very welcome addition as well. But I’ve never had a tank bag for my Honda CB750 Custom. I’ve felt that lack. Well, now I have one.

I took the bag from the Kawi with me on the Honda one trip and utterly regretted that. Whereas on the Connie it sits–with magnetic attachment–on a broad gas tank with wind protection from the fairing. On the Honda the tank was probably OK, not great, but with no fairing the wind wanted to lift it up and throw it around and I spent that whole trip fighting to keep it in place. A real horror! Nope, I needed a tank bag that straps down securely for the Honda.

So, as I often do, I received an email from the folks at Viking Bags offering to give me some gear in exchange for my testing and reviewing it. Usually I ignore these emails because one person really only needs just so much gear. But this time I figured what the heck, it would be nice to have a tank bag for the Honda.

Of course, nobody makes bags today designed specifically for a motorcycle made in 1980. But Viking does offer bags designed to fit many specific makes and models so I looked at what they had for Honda and picked one that struck me as possibly working on my Honda. I chose to go with the Viking Dirtman Medium Black Dirt Bike/Enduro Tank Bag.

I received the bag Saturday and immediately took it out to put it on the bike. I knew this might be less than straightforward.

Securing the bag under the seat

The back strap was easily secured under the seat.

The first thing I knew I needed to do was to remove the seat and loop the back strap under the slot where the tongue on the seat slips in to be held in place. That was easy, although removing the seat on this bike is never easy. That particular design element is so much better these days than it was in 1980.

Attaching it in front was not so simple. On this old bike, the gas tank straddles the backbone of the bike’s frame and wraps around the steering post. I slipped the straps into that V and then brought them back up to the bag. I wasn’t sure this was going to work but when I tightened everything down it did seem to do the job. The real test will be when I take it for a ride and see how it does.

I also had to figure out just what to do with the rest of the straps and I kind of jerry-rigged that.

It appears secure. What I like about it is that, as the name implies, this bag is designed for a dirt bike so it sits back on the tank, pretty much in the space where the actual tank on my Concours is. This leaves me free access to my gas cap so unlike with the other two, I won’t need to remove the bag to put gas in the tank.

Right now the strap comes up the side of the tank and that is a bit unsightly so I will probably try setting it up differently but for now it looks like it will work. I’ll be following up this post with an actual description of the bag and discussion of its features. I’ll also explain there how I finally decide to handle all this set-up.

In the meantime, I think it’s going to be really nice to finally have a tank bag on this bike. Heck, I’ve had this motorcycle for 33 years.

Biker Quote for Today

100 reasons not to date a biker: 5. Bonus at work? We’ll buy shiny bits for our bike instead of taking you on a romantic vacation.

Progress On The Kawi Top Bag

Thursday, March 18th, 2021
a mock-up of a mounting system

Is this really all it’s going to take, a couple steel bars bolted on to attach the top bag to?

I’ve been trying for months to figure out how to mount this top bag on the rear of my Concours and I think success is near. I had asked my mechanic, Joel, if fabricating something to mount it on was something he could do and he demurred, saying that kind of thing is not in his realm of expertise.

However, the second time we talked about it he said he has a friend who also rides a Concours who has a bag mounted on a bracket he made himself. I asked if he would be willing to help me out and Joel gave me his phone number. That’s how I met Tom.

I called Tom and we talked and then just before the blizzard hit I drove the bag and it’s mounting basket to him. That gave me a chance to take a look at the bracket he has on his bike. His wife wanted a backrest up kind of high so his bracket elevates the bag quite a bit. That wasn’t something that particularly appealed to me.

Apparently, not raising the bag makes the whole thing a lot simpler. As you can see in the photo of the mock-up that Tom sent me, he’s figuring all we really need is a couple strips of steel bolted onto the bike, and then attach the basket to the steel strips. Then just slip the bag into the slot on the basket, secure it with its thumb-screw, and voila!

The one thing I’ve been concerned about, and I asked Tom about this, is that Kawasaki stuck a sticker on this rear fender area saying not to put more than 11 pounds of weight on it. Dang, by the time you get the bracket, the basket, and the bag on there you’ve already eaten up nearly half that weight. So I asked Tom if Kawasaki was just being overly cautious, and what his experience has been.

Tom said he has had his bag on his bike for nearly 10 years and no problem. On top of that, I ended up talking to Jungle yesterday, and Jungle is a mechanic who has owned several Concourses. He said he built a rack for a bag on one of his and he never had any problems with too much weight. He did mention that you don’t want to put a lot of weight up high way out back because that can throw off the suspension and affect your steering. But a little bit is no big deal.

Now, the truth is, what has made me envious for years is watching how my friends get off their bikes and take off their jackets and helmets and throw them in the top bag and walk away. Not having one, I’ve always had to keep my jacket with me, and that can be a pain. But the key there is, you can’t throw your helmet and jacket in the bag if it’s full of other stuff. So if you don’t put much in it then there’s not going to be a lot of weight. Then a bit of weight when you’re just parked is not a big problem. And you’ll remove that weight before you take off again.

So my concern has been mollified. Now I’m just waiting for the finished product. This is going to be great.

Biker Quote for Today

Motorcyclists who don’t wear a helmet probably don’t have a brain to protect anyway.

Motorcycle Pix With GoPro

Thursday, February 25th, 2021

I kind of like this posterized sort of shot; it’s a little arty.

I use a photograph with every one of these posts, and I almost never use the same photo twice. That means that every time I go out I’m shooting more–I burn through a lot of them.

A lot of the time, in order to get shots of bikes on the road, I carry my camera strapped around my neck and when the situation permits I’ll pull it up and fire off a few shots as I ride. Thank you auto-focus and auto-exposure for making this possible. But this practice is not without risks. Some people–maybe you!–would say it’s stupid and dangerous.

A view off to the side while riding off the top of the dam.

Besides the risk, however high or low it is, there are limitations because often just when I’d like to take a shot or two I really need both my hands on the grips and my eyes on the road. I miss an awful lot of good pictures for that reason.

Enter the GoPro camera. This thing is designed to be mounted and either turned on to shoot photos or video or else to be triggered manually with a remote device. Judy gave me this camera for Christmas several years ago and other than taking a ride over Guanella Pass with it recording, and up and down the Lookout Mountain road, I really haven’t used it.

A bit of fish-eye lens effect.

Quite some time ago I decided it was time to use it. I keep a to-do list and it has been on the list for months. This week I finally checked it off the list.

The GoPro is a pretty cool little device but I had found that shooting video of riding a motorcycle is just not that exciting. Maybe if I was racing at 150 mph around a track with other bikes alongside and in front, but I don’t do those things. So I concluded my best use for it would be to shoot individual photos using the remote. Stick it in the mount on top of my helmet, look at what I want to shoot, and press the button.

The thing with the camera is that it shoots in super wide view and has incredible resolution. It’s almost a fish-eye lens, so the horizon arcs and things get distorted the further you get from the middle of the image. So if all I want is shots of some guys on bikes ahead of me on the road, they come in sharp and I just crop out 90 percent of the image. Plus, even at full magnification the resolution is not at all bad, although it gives sort of an artsy, posterized image.

And then here’s the kicker. All of these shots above were taken from one photo, the one below. I was looking a bit off to the right but the ultra wide lens got half of the world around me. I think I’ll be using this camera more in the future.

The one picture that all the above pieces came out of.

Biker Quote for Today

You know you’re a biker if your best friends are named after reptiles.

A Different Kind Of Throttle Lock

Monday, September 28th, 2020
Kaoko throttle lock

This is the Kaoko throttle lock he had on his ST.

I was riding with the RMMRC recently and there was a new guy on his first ride with the group. I didn’t catch his name. What I did catch was that he had a throttle lock I’d never seen before.

throttle lockOf course, the large percentage of modern touring bikes come with cruise control built in. Cruise control is superior to a throttle lock because you set the speed and the engine revs more going up hills and less going down so you stay a constant speed. With a throttle lock, unless you adjust it, you’ll slow down going up and speed up going down.

Plus, in my experience, they have a tendency to slip so you periodically have to adjust them.

And I do have extensive experience here. I have throttle locks on all three of my bikes. Two of them are the type that clip on the bar and to set it you snap it shut. With a flange braced against the box that houses your kill switch and starter button it stays in place and keeps the throttle from backing off.

throttle lockThe other kind, which I have on the V-Strom, is just a lever that rotates when you turn the throttle. To set it you push it forward with your thumb so when you release the throttle it rests against the brake lever, blocking the throttle from backing off.

The first kind, which I have on the CB750 and the Concours, works best. It can slip but you can tighten it. Still, I’ve never been able to get it set on the Concours so it doesn’t slip. The second kind would probably work best if it tightly grabbed the bar but at least on my V-Strom it does not. So it slips a lot and there is no adjustment. Basically I have to speed up more than I really want, set it, and then I have a short time to relax my grip before I have to do it again.

So I was very interested in this throttle lock on this Honda ST. It is made by Kaoko and it’s more expensive than the others: about $130 versus $15 to $20. What the guy told me is that he had to take the weight off the end of the bar and then jam the coned end inside the plastic tube that allows your throttle to rotate on the bar. Then to use it you push the knob forward and set the throttle where you want it. Then let go.

How well does it work? He didn’t say a lot about that but he sure didn’t complain about it. If you ask me about my throttle locks I’ll tell you about their deficiencies and well as their benefits.

So will I try one? Oh, maybe, but spending $130 on something that might not be better than what I have is a hard choice to make. What I would really like would be if the company offered to either give me one or let me try one so I can then test it and write about it. That’s how I get a lot of my gear. But if I do end up with one, one way or the another, you can bet I’ll be telling you about it here.

Biker Quote for Today

If I was a motorcycle, a Vincent red Rapide, I’d ride around to your house, baby, get you up to speed. — Mark Knopfler

Top Bag For My Connie — Is It Really So Hard?

Monday, September 21st, 2020

Sometimes free is too expensive. I was given a brand new top bag to put on my 1999 Kawasaki Concours and I was tickled. I’ve seen bags on other Concourses so I know it can be done but now I’m scratching my head wondering how.

For starters, the bag has no hardware for attaching to a Concours. It does have the parts to attach to a rack but the Connie has no rack. Here’s the bag in question. Note that it has absolutely no brand identification either on the bag itself or on the one page instruction set.

I went digging through the forum on the Concours Owners Group (COG) website, figuring there couldn’t be any better place to start my search. I didn’t find much there but I did find several posts from guys who said they had to fabricate the brackets they used to mount their bags. That’s not encouraging.

I was handing my Honda CB750 Custom over to Joel, my mechanic, for some work so I asked him if fabricating a bracket was something he could do. He was pretty skeptical but said he knew someone with a Concours with a top bag. He didn’t volunteer to contact that person but I told him if he found a moment to do so I’d sure appreciate it. We’ll see if that goes anywhere.

So I scoured the internet. I did find a bracket that said it would fit a Concours 1000 and looking at it I thought, wow, that would work. It had a couple angled flanges with holes drilled through and I figured that would fit right over the bracket that holds the passenger backrest on. So I ordered one.

Then my brain kicked in as it should have done earlier. Hold it, I thought, if that was going to fit my bike the widest section would have to go around the back of the seat with the drilled flanges just inside the bar. These come way inside and the two closest holes are only 7.5 centimeters apart. I took a tape measure and found that to fit the backrest bracket the wider set would need to be 31.75 cm and the narrower would need to be 29 cm apart. Heck, the full width of this bracket is shown as only 29.5 cm. This picture below shows the brackets holding the backrest on. How do they get off saying this will fit a Concours?

So I went to cancel the order. It was only 10 minutes since I had placed the order and all I got was a message that Ebay (this was where I had found it) would contact the seller and see if it was possible for them to cancel. I’ll know within three days, they said. Boy, if they can’t cancel the order 10 minutes after it has been placed that’s going to seem pretty bogus.

So this is a dilemma. I’ve got this nice bag and I’ve wanted one for a long time, but how do I mount the dang thing? If I come up with an answer I’ll let you know. If you have any suggestions I would welcome them very much. Thanks.

Biker Quote for Today

We know you’re a poser if your tattoos wash off.

Latest Update On Rev’It! Riding Pants

Thursday, September 3rd, 2020
Rev'It! Vapor 2 riding pants

Just as we were setting off on our trip the zipper broke on these pants.

I’ve written before about the Rev’It! Vapor 2 riding pants I bought in November 2018, and I continue to like them a lot.

That said, I need to do an update of that review because there have been problems.

When Bill and Dennis and I met up a few weeks ago to head out on the 2020 OFMC trip we got together, as we often do, at the King Soopers in Conifer. As per usual, I went in the store to use the restroom one last time. As I zipped the pants up, however, the zipper just came right off.

Generally with zippers, there is something at the top that stops the zipper. However, in this case, something somehow got broken so right up at the top of the teeth there is now a gap between two teeth and the piece that joins the two sides of teeth just came right off. You can see this in the photo above, and on the right, two teeth from the top, you can see the gap.

I thought I might be able to get the zipper pull back on the teeth and then seal off the top but that was an exercise in futility. However, it was not all that big a deal because of that flap you see behind the zipper. This is intended to keep water out, I assume, but it also means I was not walking around with my pants open, just with the zipper unzipped. I could still fasten it at the top with that buckle.

So anyway, when I got home I contacted Rev’It! to see if it could be repaired. It’s more than a year since I bought them so I didn’t expect any warranty type of response but I hoped maybe I could send them to them and, for a small fee, they would repair and return.

Nah. All they could offer was a couple shops I can contact, one in California and the other in Washington, that might be able to do the job. I guess if I’m shipping them to one of those places it’s not any different than shipping them to Rev’It!. What I’d really prefer, though, would be if I can find some place locally where I don’t have to ship at all. If anyone has any recommendations I’d be happy to hear them.

Meanwhile, as I say, it’s not that big a deal–the pants still work just fine, and I do still like them a lot. But I did want to pass along this note about the problem in case you’re looking at buying some riding pants.

Update
OK, just since I wrote this earlier today I decided to take the pants to a dry cleaners that advertised repairs and alterations to see if they could fix the zipper. I went to Washington Park Cleaners, at 529 E Ohio Ave., and I want to mention them specifically because the lady who helped me was wonderful, and she seemed embarrassed to charge me the $5 I gave her for her efforts. And we got the zipper fixed! Yahoo! Here’s a photo of the zipper now. That shiny brass piece at the top on the right side makes all the difference.

I didn’t have to send them anywhere, I just went to a local shop.

Biker Quote for Today

Top 10 signs that a computer is owned by a Harley rider: 04. — There is a Skoal can mounted in the CD-ROM drive.